Monday 24 March 2014

Thin Pizza Crust

Gluten Free Thin Pizza Crust
I have been working on filling my freezer with easy meals for after this baby is born. I was craving pizza the other day and thought some gluten free personal pizzas would a good addition to my freezer stash (store bought frozen pizzas for the hubby). I made one large pizza for supper and 2 personal pizzas for the freezer from this recipe. It would be really easy to just freeze the crusts with no toppings (and normally I would), but for the sake of future convenience, I topped them before freezing.

Hawaiian Pizza
I got the recipe from the blog Minimalist Baker and made a few minor changes. The only special ingredients you need are brown and white rice flour, tapioca starch, and xanthan or guar gum. You could just use all brown or all white rice flour and it would still turn out. It is also egg free and milk free (if you use a cheese substitute).

Personal Pizzas

My husband was impressed with this crust and so was I. It's nice and thin with a chewy base and crispy edges. So far it's the best crust I've tried. Hope you enjoy it too!

makes 2 medium-large pizzas
Ingredients

1 cup Brown Rice Flour
1 cup White Rice Flour
1 cup Tapioca Starch
1 tsp Guar Gum (or 1/2 tsp Xanthan Gum)
1 tsp Salt
1/2 tsp Baking Powder
3 Tbsp Sugar, divided
1 Tbsp Yeast
1 1/4 cups Warm Water, divided
1 Tbsp Canola Oil (or other oil of your choice)

Directions

Proof 1 T yeast with 3/4 cup warm water and 1 Tbsp sugar. Let sit 5-10 minutes or until foamy.
In a large bowl, combine rice flours, tapioca starch, guar gum, salt, baking powder and remaining 2 T of sugar.
Make a well in the dry ingredients and add oil, remaining 1/2 cup water, and yeast mixture.
Mix until well combined.
Oil your baking sheets (or line with parchment) and use half of the dough for each pizza, or a 1/4 to 1/5 of the dough for personal sized pizzas.
With oiled hands, press the dough into desired shape (crust should be very thin).
Bake at 350 for 25-30 minutes (20-25 minutes for personal size). Dough will become dry and cracked looking but that's normal.
*
Now add your favourite sauce and toppings.
Bake again for around 20 minutes or until the edges are golden and everything seems cooked through.

* At this point you can let them cool and freeze if you want. If you add toppings before freezing you can bake them from frozen (about 20 minutes). If not, let them thaw before topping and baking for 15-20 minutes.
I put my toppings on my crusts while they were still warm so the cheese was starting to melt just a little bit. After they cooled, I wrapped them in plastic wrap and then foil and froze them individually.

Press dough into pizza pan
 
Or press them into personal sized pizzas
 (I forgot to take a picture of the baked crust before topping so you'll have to trust me that it's supposed to look dry and cracked)

Bake, top, and bake again!

Tuesday 4 March 2014

Indian Rice Pudding (Kheer)

Gluten Free Indian Rice Pudding (Kheer)
This rice pudding features coconut milk, basmatti rice and cardamom. You can get kheer in most indian restaurants. Many recipes just use regular milk, but I love coconut milk and it really compliments the cardamom spice. I buy cardamom pods from the bulk barn. It can be pretty expensive, so it's nice to be able to buy just a little bit at a time. You can also use cardamom powder instead of the pods. If you like a strong cardamom flavour, open the pods and crush the tiny seeds before adding them.

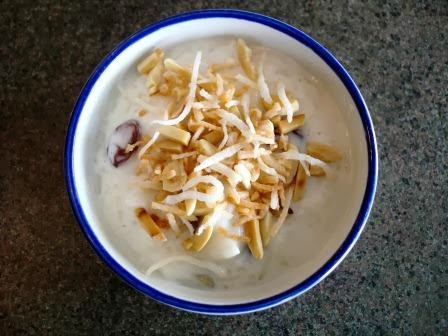
with toasted almonds and coconut
Another traditional spice in kheer is saffron. I don't usually have that on hand, but if you do you can add a few threads during cooking. Top the pudding with chopped pistachios, toasted almond slivers or toasted coconut (or all three!). You can also just serve it as is.


Kheer can be served warm or chilled. It thickens up a bit more when it's chilled. If you like a more runny consistency, you can add extra milk. It's a great dessert to go with butter chicken or any other Indian dish.

I like raisins in my pudding, but you can easily make it without.


makes 3 servings (can easily be doubled)
Ingredients

1/4 cup uncooked Basmatti Rice
1 1/4 cups Milk (I use 1% but 2% or whole would make it richer and creamier)
3/4 cup coconut milk (half a can) (I use the coconut milk with the higher fat content)
3 Tbsp Sugar
6 Cardamom Pods (or 1/2 tsp ground cardamom)
3 Tbsp Raisins (optional)
1/2 tsp Vanilla Extract (optional)
2-3 Tbsp Chopped, Toasted Pistachios, Almonds or Shredded Coconut

Directions

Combine rice, milk, coconut milk, cardamom and raisins in a sauce pan.
Bring to a low boil on medium heat (stirring often)
Turn down to medium-low and simmer uncovered, stirring occasionally, until rice is cooked and pudding has thickened (about 20-25 minutes).
To let the cardamom flavour infuse the milk, gently squish each pod with a wooden spoon once the pods have softened a bit. You don't really want all the little seeds to fall out but you want the milk to pull a lot of the flavour out.
Stir in sugar and vanilla until incorporated.
Serve warm or cool in refrigerator for a few hours. (Remove cardamom pods before serving)
Garnish with toasted pistachios, almonds or coconut.

combine rice, cardamom and milks in a saucepan
 
boil then simmer until thickened (20-25 minutes)
 
serve warm or chilled with garnish of your choice