Showing posts with label Chocolate. Show all posts

Monday, 18 December 2017

Peanut Butter Blossoms (Chickpea flour)


This is a new cookie to me but I think it's been around for quite awhile. As I searched through various peanut butter blossom recipes I read stories about this cookie being a Christmas tradition for many people. After making them I understand why! They are delicious!! Peanut butter and chocolate... how can you go wrong? 


They work great with chickpea flour; dense and chewy in the centre and a little cracked and crunchy on the edges. The sugar gives the cookie interesting texture and the kiss on top adds extra indulgence to your basic peanut butter cookie. I think these would also be great if you switched out the kiss for a rosebud chocolate or a wafer melting chocolate. Basically anything that you can use to press down the cookie and that will stick to it once cool. 


Makes around 3 dozen
Ingredients 

1/2 cup Butter or Margarine, softened
1/2 cup White Sugar
1/2 cup Brown Sugar, lightly packed
1/2 cup Smooth Peanut Butter (not natural)
1 Egg
2 Tbsp Milk
1 tsp Vanilla
1 3/4 cups Chickpea Flour
1/2 tsp Salt
1 tsp Baking Soda

1/4 cup White Sugar for rolling 
1 200g bag Kisses (rosebuds or other chocolate would work too)

Directions

In a bowl, cream sugars and butter (by hand or with electric mixer).
Thoroughly mix in peanut butter, egg and vanilla.
Add chickpea flour, then salt and baking soda on top. 
Mix dry ingredients a bit then stir everything together until the dough is smooth.
Refrigerate at least 1 hour (I did 24) - this keeps the cookies from spreading out too much. 
Roll dough into 1 inch balls and roll in granulated sugar.
Bake on a parchment lined pan for 8-9 minutes at 375 
As soon as the cookies come out of the oven, press a kiss firmly into the middle of the cookie (they will likely crack a bit around the edges - totally fine)
Let cool on a wire rack or cold baking sheet. 
Once the cookies are cool you can put them in the fridge to resolidify the chocolate.
Store in an airtight container at room temperature or freeze. 

Cream together butter and sugars and mix in peanut butter, eggs and vanilla

Add dry ingredients and mix a bit.

Mix to form a dough and refrigerate for at least an hour

Form into 1 inch balls and roll in sugar

Place on parchment lined baking sheet

Bake at 375 for 8-9 minutes

Immediately press a kiss into the middle of each cookie


Tuesday, 5 December 2017

Chickpea Flour Chocolate Chip Cookies


I've always found cookies and bread to be the most challenging things to make gluten free. It's mostly a texture thing; always too gritty, crumbly, dry, dense or just not anything like you remember! 
I come back to this problem every year at Christmas. I have a few go to cookies that are pretty decent, but I've never been able to make a basic chocolate chip cookie that compares in any way to the traditional version. 


But everyone wants cookies at Christmas, so I keep trying, and this year I have made a new discovery: Chickpea Flour!! I don't know why I haven't figured this out before. I've used flour blends that contain various bean flours, but I've never made anything with just straight up Chickpea Flour. It works amazing for cookies! These are hands down the best gluten free chocolate chip cookies I've ever made. They are chewy, crispy around the edges and actually hold together. Plus, chickpea flour is quite affordable for a gluten free flour. A 2 pound bag (907g) costs $3.70 at my Superstore (pictured below). I believe a few other brands sell it too, including Bobs Red Mill (450g for $3.50-$4) on Amazon.ca and Well.ca. And as an added bonus, chickpea flour is super healthy - full of fibre and protein. 


This is my third batch in the last month and I've finally managed to snap some pictures so I can share the recipe with you :) I've also made amazing biscotti with chickpea flour and will be testing it in a few more cookie recipes this month, so stay tuned for more chickpea flour cookies! 


I find it helps a lot to refrigerate the dough for at least an hour before baking. The cookies don't spread out as much that way. And FYI, raw chickpea flour tastes awful, so don't freak out if you hate the raw dough. The bitter taste disappears when the flour is cooked.


makes 2 dozen small-medium cookies
Ingredients 

1 1/2 cups Chickpea Flour
1/4 cup White Sugar
1/4 cup packed Brown Sugar 
1/2 cup Butter, softened
1 Egg
1 tsp Vanilla
1/2 tsp Salt
3/4 tsp Baking Soda
2/3 cup Chocolate Chips (more if you want)

Directions

Cream butter and sugar. 
Beat in egg and vanilla.
Add remaining ingredients except chocolate chips and stir the top layer a bit, then mix to thoroughly combine everything.
Stir in chocolate chips.
Refrigerate for at least 1 hour.
Roll into 1 1/2 inch balls and place on a parchment or silicone lined baking sheet. Press down slightly.
Bake at 350 for 10-12 minutes or until the bottoms are lightly browned.
Let cool on the baking sheet. 
Store in an airtight container on the countertop or freeze for later.
 
Cream butter and sugar
Beat in egg and vanilla
Mix in remaining dry ingredient and stir in chocolate chips 
Refrigerate and roll into balls. Press down slightly 
Bake at 350 for 10-12 minutes


Sunday, 26 November 2017

Turtle Pretzels


My sister-in-law introduced me to these a couple Christmas's ago and I instantly fell in love. They are the perfect combination of salty, crunchy and sweet. And they're so easy to make! She made a special version for me using gluten free pretzels. It's really nice to be able to eat a gluten free variety of what everyone else has.

For such an easy dessert, these taste amazing! This is a great treat to make I f you're not much of a baker. Just assemble, warm in the oven and press down with a pecan while the chocolate is still soft. These turtle pretzels have become a staple Christmas cookie in our house! 

Makes 30 pieces
Ingredients

30 Gluten Free Pretzels - knotted or square shaped (I used 1 small package of Glutino pretzels)
30 Rolos
30 Pecan Halves 


Directions 

Lay out your pretzels on a parchment lined baking tray. 1 small package should contain roughly 30 pieces.
Unwrap Rolos and place one on each pretzel.
Bake at 300 degrees for around 4 minutes.
Working quickly, press 1 pecan half onto each softened Rolo. 
Let cool in the fridge and store in an airtight container on the counter. 
You can also freeze these for a couple months if you want to make them in advance. 

Lay out pretzels and top with Rolos 

Bake at 300 for 4 minutes

Press down with pecans and let cool

Sorry for the poor photos.
It looks like I need to make this recipe again and take some better pictures!

Friday, 24 November 2017

Chocolate Peanut Butter Cookies (flourless)


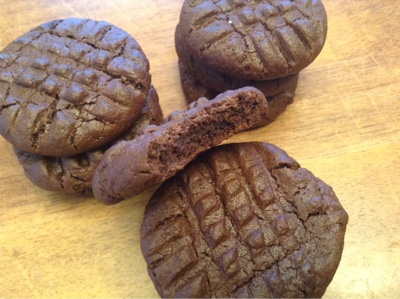
This is a decadent take on the classic flourless peanut butter cookies. The addition of cocoa powder really takes them to the next level! If you want to go over the top (in the spirit of Christmas, of course) you can add in chocolate or butterscotch chips. 


If you're looking for a gluten free cookie recipe that doesn't use any special ingredients this is a great one. Just make sure you use a new jar of peanut butter with no toast crumbs!

The fork press design is an easy way to let people know these cookies contain peanuts. It's nice to be conscious of all allergies, not just gluten ;) 

Happy gluten free Christmas baking everyone!

Makes 24 small cookies
Ingredients

1 cup Peanut Butter (natural peanut butter doesn't work. You need to use the basic, shelf stable kind)
1 Egg
1 cup packed Brown Sugar 
2 tsp Vanilla Extract
1 tsp Baking Soda
6 Tbsp Cocoa Powder

You can add in 1/2 cup chocolate or butterscotch chips if you want to make the cookies even more decadent.

Directions

Beat together the peanut butter, egg, vanilla and brown sugar until smooth.
Sift in cocoa powder and baking soda and mix until smooth.
Roll into 1-1 1/2 inch balls and press down with a fork to make the pattern shown in photos. 
Bake at 350 degrees for 8-10 minutes. 
Let cool before removing from pan.

Beat together peanut butter, egg, vanilla and brown sugar.

Sift in Cocoa powder and baking soda.

Roll into balls.

Press down with a fork.

Bake at 350 for 8-10 minutes. 

Enjoy!

Saturday, 23 April 2016

Qualifirst Review: Cocoa Powder, Cocoa Nibs, Dried Cherries, HazlenutPaste

I'm really excited to be doing a review for the Canadian gourmet food company, Qualifirst! They provide ingredients to many professional chefs and carry a great selection of gourmet ingredients from around the world. Check out the Qualifirst website for more info.


I recieved sun-dried cherries, sun-dried blueberries, sun-dried cranberries, hazlenut paste, organic cocoa nibs, crystallized maple syrup, extra bold amber cocoa powder, chestnut purée and lavender blossom honey. Sounds amazing right? But way too much to handle in one post, so I will split it up into a few different posts. Many of these ingredients are new to my kitchen so it has been a bit of a learning opportunity for me too! I'm really excited to taste the lavender honey and maybe try my hand at a chestnut pavlova cake! 

Banana Chocolate Chip Muffins with Cocoa Powder and Hazlenut Paste

I started by testing out the cocoa powder and hazlenut paste. I decided to use them both in my GF banana chocolate chip muffins. I added 3 Tbsp cocoa powder and 2 1/2 Tbsp hazlenut paste, hoping to create a kind of Nutella flavour. It turned out amazing! I've been having one with warm milk for a bedtime snack every night since I made them :D


I have never had the opportunity to use this Italian ingredient, and after doing a quick taste test, I considered eating the jar by the spoonful. It tastes just like the inside of those hedgehog chocolates, except not really sweet. Really, really good. I knew it would pair great with a chocolate flavour... and would probably be delicious spread over some GF toast. I think it would also make an amazing in a GF chocolate hazlenut biscotti. That is definitely on my to do list now. It's very rich and smooth, so a little goes a long way. I would love to get my hands on more of this stuff! 


As the name implies, it is a very rich, flavourful cocoa powder. The colour is a deep reddish-brown and the flavour is smooth, dark and bitter. A little went a long way in my banana chocolate chip muffins, and the dark colour and taste was amazing in Dark Chocolate Cherry Energy Bites. Definitely a high quality cocoa powder. 


I created a new recipe to incorporate the cocoa powder, cocoa nibs, and sun-dried cherries. I've made energy bites before, but for some reason these Dark Chocolate Cherry Energy Bites were disappearing in a fraction of the time. I used mini chocolate chips along with the cocoa nibs to balance out some of the bitterness. I have enough leftover ingredients to make this recipe again, and I will! 

Dark Chocolate Cherry Energy Bites

I've had dried cherries in the past, but to my knowledge, never sun-dried cherries. They are so much better! I was expecting them to be sour and firm, but they were flavourful, soft and sweet. Another ingredient that I could eat as is. They would be great in trail mix, granola, or baked into scones or muffins. I used them in my Dark Chocolate Cherry Energy Bites


Again, I've never worked with this ingredient in baking. I've tasted cocoa nibs in store bought products, but never purchased them on their own. I usually see them in granola bars or chocolate, so I tried to use them in a similar way (in the Dark Chocolate Cherry Energy Bites). I only used a tablespoon because the flavour is intense and they are very crunchy. A little goes a long way, a truth I am repeatedly discovering in all of the gourmet Qualifirst ingredients. 
Cocoa nibs are made from cocoa beans that have been dried and roasted. They contain magnesium, fibre, iron and antioxidants - basically all the health benefits that are attributed to dark chocolate, and more. And as an added bonus, these ones are also organic!

I'm loving everything I've tried so far! My Qualifirst review will continue in another post :)

Disclaimer: The products were sent to me free of charge. All opinions are my own. 

Thursday, 21 April 2016

Dark Chocolate Cherry Energy Bites


I've recently discovered the joys of energy bites. I love these little things because they're super quick to make, and easy to eat! You can add in all different kinds of flavours. Use almond or cashew butter instead of peanut butter, replace chocolate chips with white chocolate, add in shredded coconut, different flavour extracts, etc.


This version highlights some of the gourmet ingredients I recieved from Qualifirst to review: cocoa nibs, dried cherries and cocoa powder (see my Qualifirst review). I used a combination of cocoa nibs and mini chocolate chips because I wanted some of the sweetness from the chocolate to balance out the rich, yet bitter, unsweetened cocoa nibs. If you don't have cocoa nibs you can use extra chocolate chips or omit them all together. 


My husband and son ate most of these before I could so I will have to make another batch soon! Maybe in a new flavour...

Makes 12 bites

Ingredients

1 cup Pitted Dates
1/4 cup Natural Peanut Butter (regular works too)
1/2 tsp Vanilla
1 Tbsp Cocoa Powder 
1 Tbsp Cocoa Nibs
1 Tbsp Mini Chocolate Chips
1/4 cup GF Quick Oats
2 Tbsp Dried Cherries 

Directions

If your dates are hard and dried out, you may need to soak them in water for 15 mins to soften them up.
Blend dates in a food processor until they form a dough like ball  (I use my mini kitchen aid processor)
Add peanut butter and vanilla and blend until well combined.
Add cocoa powder and blend until you have a dough like mixture. Add water by the 1/2 tsp if you need more moisture.
Dump your mixture into a bowl with cocoa nibs, chocolate chips, cherries and oats. 
Stir until well combined.
Form the balls.
Store in fridge or freezer.

Date paste, peanut butter and vanilla

Add cocoa powder and water if needed

Finished "dough"

Mix with oats and add ins

Mix

Form into balls and refrigerate or freeze

As my 2 year old says: "mmm dee-wish-iss!"

Saturday, 26 September 2015

Inside Out Bakery in Saskatoon

I'm excited to do my first post on a local business! Lucille from Inside Out Bakery here in Saskatoon contacted me and told me about some of the things she has going on with her bakery. I had never heard of it, so was glad she reached out. I got to drop by the bakery on Avenue C and taste some of the goodies!

Inside Out Bakery is a facility free from gluten, dairy, peanuts, tree nuts, refined sugars, yeast, xanthan gum and MSG. They also carry a range of products that are--or can be altered to be--paleo, vegan or diabetic friendly. Many ingredients used are organic, so there's an option for everyone! 


In the bakery on Ave C

They use whole foods and healthy ingredients, swapping white sugar for date paste and other natural sweeteners. Lucille told me they like to use a lot of coconut flour and bean flour for fiber and nutrition. Instead of white rice flour they use brown, and when starches are necessary, arrowroot and tapioca are used instead of more refined corn or potato starch. They even make their own chick pea paste from scratch by roasting and grinding the peas right on site.

in the bakery on Ave C

Products are baked fresh to order or can be bought off the shelf at the bakery or at Herb N Health on Broadway and 9th. They have an amazing selection of products including cookies, cakes, cinnamon buns, breads, muffins, and even soups. Orders can be picked up at various locations around the city (see their website for more details) and they will also deliver for a fee. Lucille told me she is working on getting her products in another location downtown as well. 


Muffins (banana chocolate chip, pumpkin, carrot cake), cinnamon buns, chocolate chip shortbread, lemon shortbread, lemon and chocolate cupcakes and biscuits


pumpkin, banana and carrot cake muffins

I had the chance to taste a few of their products and was impressed. My husband said their carrot cake is comperable to any carrot cake he's had and I have to agree. All mine needed was a little cream cheese icing! (I believe they offer their carrot cake with a coconut cream frosting). My favourite would have to be the cinnamon buns. They are chewy and goey and sweet, even though they're made with date paste and whole grain flours! I froze a few and am eating the last one right now. Microwaved from frozen, these cinnamon buns are just as good as they were fresh. Mmmm... I also really enjoyed the chocolate icing that was on the chocolate cupcake. The cupcake was good, but the icing was to die for: rich, dark, and delicious! The biscuits were soft and mild in flavour but were yummy with butter and jam and are designed to go alongside a soup or stew.


goey cinnamon buns

They really infuse a lot of flavour into their baking. There are lot of spices (cinnamon, ginger, etc.) in their muffins and the flavour comes through very strong. I really like spices so this was a plus for me. The lemon flavour in the lemon shortbread and cupcakes was strong too. They use the whole lemon, including the zest, so the flavour is very bright, tart, and citrusy. To see all the products they offer, check out their website.


mini cupcakes 

Because they use fiber rich, nutrient packed whole grains and foods, their products tend to be more dense than their wheat flour counterparts, but I think (and my gluten-eating husband agrees) the texture is still great and the flavour is definitely there. You can really taste the coconut flour flavour in the muffins. 


some natural products they have for sale at the bakery

Support a local business! You can order a cake for a birthday party, cinnamon buns and muffins for a morning business meeting, go sit down in their Broadway location for soup and dessert, or Ave C bakery for a cold drink and warm scone. I think it would be great for restaurants, coffee shops or hotels to have some treats from Inside out Bakery on hand for guests with dietary restrictions. Most products can be kept frozen and microwave beautifully. Lucille also mentioned they are hoping to open up a location in Lloydminster in the near future!


a nice place to sit and taste some goodies or just wait for your order to be ready

Have you tried anything from the Inside Out Bakery? What did you think?