Thursday, 1 December 2011

Thai Soup


Gluten Free Thai Soup with Rice Noodles

Both my husband and I love Thai food. I love the ginger, coconut milk and lemony flavours. One of our favourite restaurants in Saskatoon is Thai (Keo's). We like it so much that I sometimes try to recreate their menu items. To this point my (re)creations have been unsatisfactory and rather unidentifiable. My tamarind is too sour (maybe I used too much?), I don't have any lemon grass, I have no idea what kind of curry they use and where to get it, and I am receiving most of my Thai cooking classes from Google. So I gave up trying to recreate, and instead started to create. Using my new found knowledge of basic Thai flavours (yes, from Google), I got cooking. (I really doubt that I had this all planned out like I'm making it sound, and I'm pretty sure this recipe was more of a delicious accident than anything, but I'll still take the credit!)
This delightful Thai soup recipe is what I came up with. My husband literally jumps for joy when I announce I am making it for supper.It's a little labour intensive with all the julienning of the veggies, but it's totally worth it. The secret (Thai) ingredients are fresh ginger, Asian fish sauce (which sounds and kind of smells disgusting, but trust me, it adds the perfect flavour), peanut butter, and lime or lemon juice (I think Thai food usually uses lemon grass, but I don't really know where to get it). You can substitute different vegetables based on what you like and what you have on hand.

This is what I had on hand


I hope you love this soup as much as we do!

(serves 3-4 people)
Ingredients

1 Tbsp Olive Oil
4 Cloves Fresh Garlic, minced
1 Small Onion, minced
1 Tbsp Fresh Ginger, grated or minced
1/2 tsp Freshly Ground Pepper
1 1/2 cups Chicken Stock
1 cup Coconut Milk
1 Tbsp Asian Fish Sauce (you could probably sub soy sauce but it wouldn't be the same)
2 Tbsp lime juice (or lemon juice)
3/4 cup Water
2 Carrots, julienned
1 cup Bean Sprouts (or Cabbage, julienned)
1/2 Red Pepper, julienned
2 tsp Chili Flakes
2 Tbsp peanut butter
1 tsp Lime Zest (optional)
Salt to taste
1-2 Boneless Skinless Chicken Thighs, chopped into bite sized pieces (Tofu works good here too)
3-4 cups Cooked Thin Rice Noodles

Garnishes:
  Cilantro
  Chopped Peanuts

get your ingredients ready to go before you start cooking
Directions

Cook rice noodles according to package directions and divide between 3 or 4 bowls.


Heat oil on medium heat in a large pot.
Saute minced onions until translucent.
Add garlic, ginger and pepper. Saute for another minute or two.
Add chicken stock, coconut milk, fish sauce and water. Bring to a boil.
Bring soup down to a simmer and add carrots, chili flakes, chicken. Cover and simmer for 5-7 minutes.
Add cabbage or bean sprouts, red pepper and peanut butter. Let cook for another 3 minutes.
Add lime juice and zest (if using). Salt to taste.

Serve soup over cooked rice noodles.
Garnish with chopped peanuts and cilantro.

onions, garlic, ginger and pepper
coconut milk and chicken stock added
Add chicken and firmer veggies
cover and simmer for 5-7 mins

serve over rice noodles and garnish with peanuts and cilantro... i didn't have any :(

Monday, 21 November 2011

Pie Crust


Gluten Free Pie Crust

This recipe comes from my mom. She has perfected the art of pressing gluten free dough into pie plates. I am still working on this skill. It takes a bit of practice, but it's still more forgiving than rolling out dough like a traditional pie crust. 

You will probably only need about 1 cup of the dough for a pie crust. You will have quite a bit more than that, but you can freeze the leftover dough for later, use it to make some tarts (press into muffin tins) or bars, or make some sugar cookies out of it. You should make your crust roughly 1/4 inch thick (or even less if you want). You can measure the depth by stabbing a fork in until it hits the pie plate.

On my first attempt (see pumpkin pie) I didn't check the depth and ended up with a base that was way to thick. It still tasted good, but it was definitely lacking a bit in the pumpkin department. Learn from my mistakes and check your depth!

You can use this recipe for any open faced pie or tart. It's great for fresh strawberry pie as well as chocolate, banana or coconut cream pies. You can also use it as a base for dessert bars or squares.

Ingredients

1 1/2 cups Rice Flour
1/2 tsp Cream of Tartar
1/2 tsp Baking Powder
1 1/2 tsp Guar Gum (or 1 tsp Xanthan Gum)
1/4 tsp Salt
1/2 cup cold Margarine
1/4 cup Sugar
1 Egg
1/2 tsp Vanilla Extract

Directions

Mix together flour, tartar, baking powder, guar gum, and salt.
Cut in margarine until it's small pea sized.
Beat sugar, egg and vanilla separately. Add to dry ingredients.
Mix dough until it forms a clump (use your hands)
Press about 1 cup dough into pie plate so the crust is about 1/4 inch thick (or muffin tins, or a baking dish if making bars)
Bake 10 minutes at 350 before adding filling.
Bake again with your pie filling of choice.

add wet ingredients to margarine/flour mixture

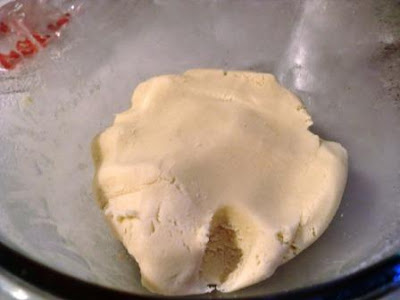
ball of mixed up dough
pressed into plate (no more than 1/4 inch thick)... as you can see, mine is too thick

ready for the filling

sugar cookies made from leftover dough


Use crust for:

Pumpkin Pie
as you can see, the crust is waaaay too thick... live and learn

Butter Tart Bars


Fresh Strawberry Pie


Banana (or Coconut or Chocolate) Cream Pie


Pumpkin Pie

Gluten Free Pumpkin Pie
A pumpkin pie recipe! Just in time for American Thanksgiving. This is my first attempt at making any type of pie, but my mom has made this pie recipe dozens of times, so I know it's good. As with most gluten free pie crusts, you have to press the dough into the pie plate instead of rolling it out. I messed up a bit with this part because I forgot to check the depth on the bottom of the crust. It turned out way too thick... oops. Luckily, the dough tastes like a sugar cookie, so it wasn't the end of the world. Next time I will remember to check the depth with a fork before baking the crust. Other than that slight misstep, the pie turned out great.


The pumpkin filling is especially easy to whip up using a blender. It's actually quite healthy too! Pumpkin is full of vitamins and fiber, cinnamon and ginger are thought to have a wide array of health benefits, eggs have good protein and milk has calcium. Also, there isn't too much added sugar. Of course when you bake it in a buttery crust and smother it with whipped cream it starts to look more like what you'd call dessert. Just know that along with all the fat and calories, there's actually some good stuff going on in that slice of pumpkin pie!


crust recipe here

Ingredients

1 1/2 cups Pumpkin Puree
1 Tbsp Corn Starch
1/3 cup Granulated Sugar
2 Tbsp Brown Sugar
1 1/2 tsp Cinnamon
1/2 tsp Nutmeg
1/2 tsp Ginger Powder
1/4 tsp Cloves
     (or use 2 1/2 tsp Pumpkin Pie Spice)
1 2/3 cup milk (I use 1%)
1/2 tsp Salt
2 Eggs

Whipped Cream for topping

Directions

Blend all ingredients together in a blender.
Pour into partly baked pie shell. (crust recipe) If you can't fit all of the filling in, pour the extra into ramekins and cook alongside the pie.
Bake at 375 for around 1 hour.
Pie is done when inserted knife comes out clean.
Let cool completely and serve with a dollop of whipped cream (or ice cream).


before baking


after baking

yummy slices waiting to be eaten

Saturday, 19 November 2011

Pumpkin Pancakes


I made this recipe in order to use up some leftover pumkin and to try out my Tropical Traditions Gold Label Virgin Coconut Oil. I love pancakes (as you can probably tell from looking at my recipe index page) and I love pumpkin, so I figured this was a match made in heaven. I wanted to use both coconut oil and some coconut flour I picked up from the bulk barn. I searched high and low for a recipe that included all my special ingredients, but it was not to be found. So, naturally, I made one up. I threw together a couple somewhat healthy flours and the basic pancake ingredients (baking powder, eggs) with my coconut oil and pumpkin puree. I added 1 cup of milk to start, but after attempting to pour my first pancake, realized I would need much more. I ended up with 2 cups of milk and almost 1/2 cup water before I got it the right consistency. The amount of milk needed will probably vary depending on your brand of flour, so start with less liquid and adjust from there. I like my pancakes flatter than most, so I keep my batter quite thin.

If you want to substitute 1 1/2 cups of your favorite flour blend for the flours I listed in the recipe, you may not need as much added liquid. Start with 1 cup milk and add more if you need to. If you don't have coconut oil, you can use any other oil or butter/margarine instead.

As always when working with coconut oil, make sure all ingredients are at room temperature (especially eggs and milk). I actually microwaved my milk a bit before adding because my eggs were too cold and the oil was solidifying. I'm not very good about planning ahead and letting the eggs get to room temp (it takes longer than you'd think). Just don't microwave your eggs or they will cook!

(makes 12-15 large thin pancakes)

Ingredients

1/2 cup Brown Rice Flour
1/2 cup Coconut Flour
1/4 cup Tapioca Starch
1/4 cup Buckwheat Flour (or millet flour)

1/2 tsp salt
1 Tbsp Sugar
1 Tbsp Baking Powder
3/4 tsp Cinnamon
1/4 tsp Ginger
1/4 tsp Nutmeg
      (or use equivalent amount of pumpkin pie spice blend)

1/2 cup Pumpkin Puree
3 Eggs
3 Tbsp Coconut Oil (melted)
2 cups milk

You can add up to 1/2 cup water depending on your preferred pancake thickness.

Directions

In a mixing bowl, combine flours/starches, salt, sugar, baking powder and spices.
In a separate bowl, whisk together pumpkin, eggs, melted coconut oil and 1 cup milk. Make sure ingredients are at room temperature.
Stir wet ingredients into dry ingredients and add the rest of the milk and water if necessary.
Pour batter into oiled nonstick pan, flipping when bubbles start to pop on the surface.

I added a little more liquid after taking this pic


Variations: add chocolate chips or chopped nuts to the batter

Saturday, 12 November 2011

Peanut Butter Cookies 3.0 (flourless)


Peanut Butter Cookies 3.0 (flourless)
I cannot take credit for this recipe. I found it online when I was searching for GF peanut butter cookie ideas. I also don't know who to credit for the recipe because it is so common. If you google gluten free peanut butter cookies, you will find many recipes similar to this. The only difference is that most contain baking powder and mine doesn't.

This cookie is very sweet and a bit crumbly. The recipe doesn't contain any flour and can be made with only 3 ingredients (sugar, PB, and an egg). My husband declared this cookie his favorite, saying it wasn't the same as mom's, but it was still pretty good. I found it almost too sweet and a little gritty from all the sugar, plus I'm sure the calorie count is through the roof. Just try not to eat more than two in a sitting (and make them small).

This recipe is a great one to make if you don't have any special gluten free ingredients on hand (or if you're looking for a dessert to make for a gluten free friend). It's quick and easy, and it's a guaranteed hit with anyone who likes peanut butter.

Ingredients

1 cup Sugar
1 cup Peanut Butter (regular or just peanuts/all natural kind - and make sure there's no crumbs!)
1 Egg
1 tsp Vanilla (optional)

Directions

Cream together sugar and peanut butter.
Beat in the egg and vanilla.
Roll into 1-1 1/2 inch balls with hands and press down a bit with a fork.
Bake at 325 for around 12 minutes.

before baking

cooling


Peanut Butter Cookies 2.0


Peanut Butte Cookies 2.0
This is my second attempt to create gluten free peanut butter cookies. This is also my favorite of the 3 recipes. The cookies are soft and chewy in texture and not too sweet. I'm planning to try these again using 3/4 cup peanut butter instead of 1/2 cup PB and 1/4 cup margarine, but I know this recipe works as is. The baking powder makes for a fluffier cookie compared to the other two recipes. If you try this recipe, let me know what you think!

Ingredients

1/2 cup Peanut Butter (look out for crumbs!)
1/4 cup Margarine
1/4 cup White Sugar
1/4 cup Packed Brown Sugar
1 Egg
1-2 Tbsp Milk
1/2 tsp Vanilla
1/2 tsp Baking Powder
1/8 tsp Salt
6 Tbsp Rice Flour
2 Tbsp Potato Starch
1 Tbsp Tapioca Starch

Directions

Cream together PB, margarine, and sugars.
Beat in egg, vanilla and milk.
Add baking powder, salt, flour and starches and mix well.
Roll dough into balls with hands (will be sticky).
Mark cookies with traditional fork imprints (if the dough is sticking to the fork, try wetting it before pressing)
Bake at 325 for around 12 minutes.

I forgot to take a picture before baking the cookies, so you'll have to use your imagination.

PB cookies 2.0 after baking
Cooling

Peanut Butte Cookies 1.0

Peanut Butter Cookies 3.0 (flourless)

Peanut Butter Cookies 1.0


My gluten-eating husband loves his peanut butter cookies. Well, he loves the ones his mom makes... which, of course, have flour. He had been requesting peanut butter cookies for awhile, and I didn't have a good gluten free recipe, so I decided to try to make one up on my own. So I have been experimenting, trying to create something reminiscent of mom's famous PB cookies.

Peanut Butter Cookies 1.0

Peanut Butter Cookies 2.0

Peanut Butter Cookies 3.0

I have created 3 (well, one I found online) completely different PB cookie recipes. Hubby has a favorite, which unfortunately is different than mine, but I think they are all worth posting on this blog. I will try to describe each cookie in detail so that you can make an educated decision regarding which recipe you want to use.

The first recipe I will share has a chewy and crunchy texture... almost taffy like. They were quite thin and pretty sweet. My husband informed me that they were nothing like mom's cookies, but I thought they were decent. They spread out a ton while cooking and, sadly, lost the signature fork marks applied before baking. I think I used low fat peanut butter in this recipe, so it might turn out a bit differently if you use the regular stuff. This recipe wasn't our favorite, but if you like crispy/chewy cookies, try this one out. And don't forget to let me know what you think! If you try more than one recipe, please tell me which was your favorite :)


Ingredients

1 cup Peanut Butter (watch out for crumbs!)
1 cup Sugar
2 Eggs
1/4 cup Rice Flour
2 T Tapioca Starch
1 T Corn Starch

Directions

Cream together sugar and peanut butter.
Beat in eggs.
Add in flour/starches and mix thoroughly.
Make small balls with your hands and place them on ungreased cookie sheet. (will be sticky)
Bake at 325 for 10-14 minutes.

sticky cookie dough

before baking

after baking - no more fork marks


Peanut Butter Cookies 2.0

Peanut Butter Cookies 3.0 (flourless)