Tuesday, 4 March 2014

Indian Rice Pudding (Kheer)

Gluten Free Indian Rice Pudding (Kheer)
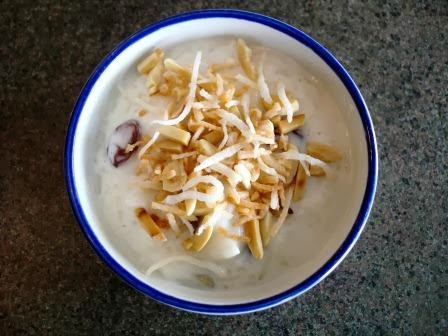
This rice pudding features coconut milk, basmatti rice and cardamom. You can get kheer in most indian restaurants. Many recipes just use regular milk, but I love coconut milk and it really compliments the cardamom spice. I buy cardamom pods from the bulk barn. It can be pretty expensive, so it's nice to be able to buy just a little bit at a time. You can also use cardamom powder instead of the pods. If you like a strong cardamom flavour, open the pods and crush the tiny seeds before adding them.

with toasted almonds and coconut
Another traditional spice in kheer is saffron. I don't usually have that on hand, but if you do you can add a few threads during cooking. Top the pudding with chopped pistachios, toasted almond slivers or toasted coconut (or all three!). You can also just serve it as is.


Kheer can be served warm or chilled. It thickens up a bit more when it's chilled. If you like a more runny consistency, you can add extra milk. It's a great dessert to go with butter chicken or any other Indian dish.

I like raisins in my pudding, but you can easily make it without.


makes 3 servings (can easily be doubled)
Ingredients

1/4 cup uncooked Basmatti Rice
1 1/4 cups Milk (I use 1% but 2% or whole would make it richer and creamier)
3/4 cup coconut milk (half a can) (I use the coconut milk with the higher fat content)
3 Tbsp Sugar
6 Cardamom Pods (or 1/2 tsp ground cardamom)
3 Tbsp Raisins (optional)
1/2 tsp Vanilla Extract (optional)
2-3 Tbsp Chopped, Toasted Pistachios, Almonds or Shredded Coconut

Directions

Combine rice, milk, coconut milk, cardamom and raisins in a sauce pan.
Bring to a low boil on medium heat (stirring often)
Turn down to medium-low and simmer uncovered, stirring occasionally, until rice is cooked and pudding has thickened (about 20-25 minutes).
To let the cardamom flavour infuse the milk, gently squish each pod with a wooden spoon once the pods have softened a bit. You don't really want all the little seeds to fall out but you want the milk to pull a lot of the flavour out.
Stir in sugar and vanilla until incorporated.
Serve warm or cool in refrigerator for a few hours. (Remove cardamom pods before serving)
Garnish with toasted pistachios, almonds or coconut.

combine rice, cardamom and milks in a saucepan
 
boil then simmer until thickened (20-25 minutes)
 
serve warm or chilled with garnish of your choice

Sunday, 26 January 2014

Enjoy Life Dark Chocolate Morsels Review


I received this product from Enjoy Life to review. I am a huge dark chocolate fan, so I jumped at the chance to test these chips. They didn't disappoint! They are rich and smooth and have that characteristic bitter dark chocolate taste (and made with 69% cacao).

GF Pumpkin Chocolate Chip Muffins with ELF dark chocolate morsels

I used the dark chocolate morsels in my GF pumpkin muffins and they tasted great. Even though they are free from dairy and other allergens, they don't taste like they are missing anything. I think they would also be good in chocolate chip cookies, or really any recipe that works with dark chocolate. The morsels are close to your average chocolate chip size, making them an easy substitution in any recipe. Each bag costs around $5.50 online, making them fairly pricey compared to regular chocolate chips, but they are a great option for individuals who need to avoid dairy.

Cost 2.5 stars
Taste 5 stars
Texture 5 stars
Overall Rating: 4.2 Stars
 
 
Thanks Enjoy Life Foods for providing these free samples for me to review. All opinions are my own.

Wednesday, 11 December 2013

Ginger Snaps

Gluten Free Ginger Snaps
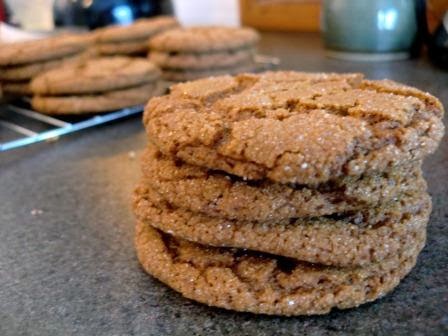
It's time to break out the Christmas baking! I've never made good gluten free ginger snaps, but my great aunt gave me this recipe the other day and they turned out amazing! Light and crispy and great for dipping in tea, milk or eggnog. I often find that gluten free cookies are quite crumbly, but these hold their shape really well.


This was my first experience baking with lard. The idea kind of grossed me out, but my aunt said that it was the best fat for this recipe, so I gave it a shot. The lard gives the cookie more of a "snap", but margarine or butter are totally fine too!


I froze about a third of the dough to bake later. It's nice to have fresh cookies without all the work (and it will keep me from eating all of them before Christmas). Just thaw the dough in the refrigerator and proceed as usual.

Happy gluten free Christmas baking!

makes 3 1/2 dozen
Ingredients

1/2 cup Lard (or substitute Margarine/Butter)
1/4 cup Margarine or Butter
1 cup White Sugar
1/4 cup Molasses
1 Egg
2 1/4 cup All Purpose Gluten Free Flour recipe here
2 tsp Baking Soda
1/2 tsp Salt
1 tsp Cinnamon
1 tsp Ground Cloves
1 tsp Ground Ginger
1 1/2 tsp Guar Gum (or Xanthan Gum)

Directions

Cream together lard, margarine, sugar, molasses and egg.
Add dry ingredients and mix well.
Make 1 1/2 inch balls and roll in white sugar.
Place on parchment lined baking sheet, leaving about 3 inches between balls.
Bake at 350 for around 12 minutes.
Let cool and move to wire rack.
Freeze in an airtight container.

Ginger snap dough

Make balls and roll them in sugar

////Place balls on parchment lined baking sheet (leave lots of space)

Bake for 12 minutes at 350
Freeze in an airtight container


Sunday, 17 November 2013

Enjoy Life Foods New and Improved Chewy Bars Review


ELF new and improved chewy bars


I have been given the chance to do a review on the new and improved chewy bars from Enjoy Life Foods! To see my review of the original chewy bars, click here. I believe they have greatly improved the product in all areas including appearance, texture, taste and ingredients.

The first thing I noticed was the new packaging. The box and bars are a light beige colour rather than the original white, which gives the product a more "natural" feel. The new bars have a bit more colour on them too. In my opinion, the new packaging is more attractive (and appetising) than the original. What do you think?

new and improved bars
 
old chewy bars
 
The biggest improvement for me is the texture. The old bars had hard crunchy bits in them that hurt my teeth, but that has been removed in the new product. The new bars also have a lighter, more cookie like texture. This is probably the greatest improvement because I found the old bars to be a little bit too chewy and dense for my liking. I think the improved texture has a lot to do with the improved taste, because it is easier to taste the bar when it isn't sticking to the inside of your mouth.

Mixed berry (formerly very berry) was my least favourite in the old bars, but I found I could taste the berry pieces better in the new bars and actually really enjoyed this flavour. The sunbutter crunch and caramel apple were mainly improved through texture. I didn't notice too much of a difference in the cocoa loco flavour, but it was my favourite to begin with so I'm happy with that.

The box says that the bars now feature ancient grains. I'm not sure what they have added (or if they've just increased the amounts) but some of the grains on the ingredient list include: quinoa flakes, puffed amaranth, buckwheat flour and millet flour.

Overall I am very happy with the changes Enjoy Life Foods has made to their chewy bars.


Thanks Enjoy Life Foods for providing these free samples for me to review. All opinions are my own

Friday, 25 October 2013

Hot Multigrain Cereal

Gluten Free Hot Multigrain Cereal

Before I had Celiac Disease, I really enjoyed having cream of wheat cereal for breakfast. I was missing it the other day and realized I could probably do something similar with rice. I was afraid that cream of rice would seem too much like baby food, so I thought I could add some other healthy, whole grains to the mix. You could probably use any grain (or seed) you want, but my favourite combination is millet, quinoa and brown rice. I also like buckwheat when I have it on hand.

with milk and brown sugar

I use my coffee grinder to grind the grains, but you could probably just as easily use a food processor. As long as the grains are ground quite fine, this would probably work great as a baby cereal too.
Top with milk and brown sugar or honey, nuts and raisins, or whatever sounds good to you.

Makes about 6 servings
Ingredients

1/2 cup Millet
1/2 cup Quinoa
1/2 cup Brown Rice

Directions

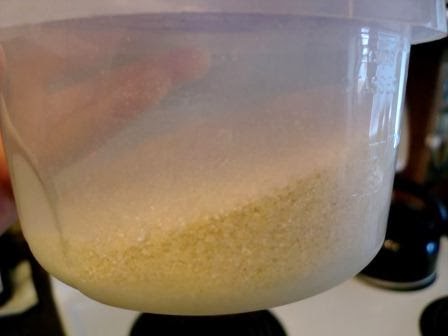
In batches, grind the grains until quite fine (not as fine as flour but not big chunks). Use a clean coffee grinder or food processor.
You can use a fine mesh strainer to remove any large chunks.
Combine in an airtight container and store for 1-2 months.

store in airtight container


To Make

Stove top (1 serving)

Bring 1 cup water to a boil in a small saucepan.
Whisk in 1/4 cup dry cereal.
Turn down to med-low and continue to stir often for 5-7 minutes, or until desired consistency is reached.

Microwave (1 serving)

In microwave safe bowl, combine 1 cup water with 1/4 cup dry cereal.
Microwave 1 minute, stir well, smoothing out any lumps. Microwave 45 seconds, stir. Continue microwaving in 20-30 second intervals, stirring often, until cereal has reached desired consistency.

1/4 cup dry cereal
 
whisk into 1 cup boiling water, turn down heat, and cook 5-7 minutes
 
serve with milk and brown sugar

Hot and Sour Soup

Gluten Free Hot and Sour Soup

I am almost 16 weeks pregnant and am just starting to enjoy food again (thank goodness)! I haven't been cooking or blogging much lately because I've been feeling so crappy. Today I am at home sick and am trying to stick to natural remedies as much as possible. I just made a pot of this soothing soup for lunch!

This soup is great for when you have a cold. The spice and steam will help to clear out your nose and the broth will help you get those much needed fluids. The fresh ginger and garlic are great for your immune system too. It's super quick to make, so you don't have to spend too much time standing over the stove when you feel crappy.

You can adjust the spice level to suit your family's preferences. I would say my version of the soup has a medium level of spice. The noodles give the soup a bit more substance, but you can leave them out if you want a very light, brothy soup (It would make a great appetizer).  The recipe only makes 3 servings but can be easily doubled.

serves 3
Ingredients

1 1/3 Tbsp Fresh Ginger, minced or finely grated
3 Cloves Fresh Garlic, minced or finely grated
1/2 tsp Olive Oil
1 Medium Carrot, grated
1 Egg, well beaten
1 1/2 Tbsp GF Beef Soup Base/Boullion (use more if needed)
5 Cups Water (or omit beef soup base and use 5 cups prepared beef broth)
2 tsp Sriracha Hot Sauce (or your favourite hot sauce)
1 Square Rice Noodles (or enough to make around 1 1/4 cups cooked)
1 1/2 Tbsp Lemon Juice

Directions

In medium sauce pan, saute garlic and ginger in olive oil for 1 minute.
Add water, beef soup base, grated carrot and hot sauce.
Bring to a boil for 5 minutes.
Add uncooked rice noodles and boil for another minute or 2. (you could also cook noodles separately and add them at the end)
Beat 1 egg and slowly pour into soup while stirring slowly (it should cook instantly)
Add lemon juice.
Taste and make adjustments (more broth, lemon juice, hot sauce, etc)
Serve and breath in the theraputic steam!


ginger, garlic and beef broth


Add carrots, boil 5 minutes and add rice noodles


Drop in egg while stirring slowly and finish with lemon juice


Tuesday, 6 August 2013

Chocolate Banana PB Muffins

Gluten Free Chocolate Banana PB Muffins
This is a decadent take on my Banana Chocolate Chip Muffins. Of course the peanut butter adds a few more calories, but it also boosts the protein content, keeping you fuller for longer. If peanuts are a problem for you, go ahead and substitute other nut/seed butters.


Since I'm adding cocoa powder to the muffins, I often leave out the chocolate chips (especially if I'm eating these for breakfast). Go ahead and adapt the recipe to your preferences (maybe use a little less sugar, sub peanut butter chips or white chocolate for chocolate, add some cinnamon and nutmeg, etc)

makes 15-17 muffins
Ingredients

1 3/4 cups light flour blend (see flour blends) (or your favourite flour blend)
1/2 cup Sugar
1 Tbsp Baking Powder
1/2 tsp Salt
3 Tbsp Cocoa Powder
1 cup (3 medium) Mashed Bananas
2 Eggs
1/4 cup Canola Oil
1/4 cup Peanut Butter
1/4 cup Milk
1/2 cup Chocolate Chips (optional)

Directions

In a large bowl, mash bananas.
Mix in oil, eggs, peanut butter and milk.
Mix all remaining ingredients except chocolate chips and gently combine with wet ingredients.
Stir in chocolate chips.
Fill muffin paper lined muffin tins 2/3 full with batter.
Bake at 375 for 15-20 minutes (until top holds it's shape when poked)
Let cool on cooling rack or tip sideways in muffin tins (ensures the bottom of the muffins don't get soggy)
Once cool, freeze in a freezer bag or container.
For best results, heat individually in the microwave until thawed.

fill muffin tins 2/3 full
Bake at 375 for 15-20 minutes
let cool