Monday, 30 July 2012

Chocolate Zucchini Loaf

Gluten Free Chocolate Zucchini Loaf
This summer is soooo hot. Maybe it's just that I've lived in a basement suite or a house with AC for as long as I can remember, but it feels hotter than most. We have taken to sleeping in the unfinished basement for now as our main floor runs at about 80-82 Fahrenheit on average in the evenings. That said, I haven't had many opportunities to bake. We had a couple rainy days last week and the temperature dropped just low enough for me to brave turning on the oven; let me just say it was well worth it!


I found a delicious looking recipe for double chocolate zucchini loaf on the King Arthur Flour website (original recipe here). It wasn't gluten free or anything, but it inspired me to try my very first zucchini loaf. While most gf loaves tend to fall in the centre, this one held its form perfectly and tasted even better than I expected! It has 2 whole cups of grated zucchini, which is a total bonus since it tasted like chocolate cake. I only put in 1/2 cup chocolate chips (original recipe called for a cup) and my husband said I should put less in unless I was planning to call it chocolate cake... then he proceeded to eat at least half of the loaf throughout the rest of the day. hehe.


I use my light flour blend, but you might be able to substitute other blends. I think the combination of rice, millet and tapioca starch gives the best texture to muffins and cakes.
This is a great way to use up zucchini from your garden or to take advantage of the low prices on zucchini this time of year. Enjoy!

(makes 1 medium sized loaf)
Ingredients

1/2 cup Brown Sugar (or 1/4 cup if you want it less sweet)
1/4 cup White Sugar
1 2/3 cups GF flour blend (my light flour blend works best)
1/2 tsp Salt
1 tsp Baking Soda
1 1/2 tsp Baking Powder
1/3 cup Cocoa Powder
2 Eggs
1/2 cup Canola Oil
1 tsp Vanilla Extract
2 cups Shredded Zucchini (don't peel, but do remove some of the middle seeded part)
1/2 cup Chocolate Chips (omit or use 1/4 cup if you want it less sweet)

Directions

Combine first 7 ingredients and mix well.
In a small bowl, beat eggs, canola oil and vanilla together.
Cut zucchini in to quarters lengthwise then cut off the part with the seeds (if some remain that's ok)
Grate 2 cups of zucchini (press down a bit in measuring cup to make sure it's full) - about 1 med-large zucchini worth
Add egg mixture to dry and mix until just combined.
Add zucchini and chocolate chips. Mix until just combined.
Pour mixture in to a greased loaf pan (preferably non-stick)
Bake at 350 for 70-75 minutes. Unless it's burning, I wouldn't cook it any less than 70 minutes or it's more likely to fall in the middle.

When done, let loaf cool in the pan for 10 minutes, then transfer to wire rack to cool completely (you may need to run a knife around the inside edge of the loaf to get it out of the pan)
It's easier to cut once completely cool, but if you're like me and can't wait that long, just be careful!
This loaf stores well at room temperature in an airtight container, or you can freeze slices for a late night chocolate craving attack!
Before Baking
After Baking
Cool on a wire rack
Slice and enjoy!


Thursday, 12 July 2012

Mini Cheesecakes with Blueberry Sauce

Gluten Free Mini Cheesecakes with Blueberry Sauce

I love cheesecake. It is probably my favourite dessert. Even better when topped with homemade blueberry sauce...mmm. Because it's just the two of us around here, making a full sized cheesecake would be kind of ridiculous... I have no doubt we would eat it, but that's just the problem. For our anniversary this year, I decided to try a more sizable version of that delicious cake. It turned out amazing... and we finished all six mini cheesecakes within a day. Oops!
Delicious!
Last weekend we were invited to spend some time at a friends cabin a few hours north of Saskatoon. We had an amazing time fishing, swimming, trying out some water sports, and hot tubbing! Unfortunately, my attempt at a sort of wake boarding was a bit of a failure. When I fell the rope tightened around my arm and I ended up dragging behind the boat for a ways. No broken bones, but some serious rope burn and crazy bruising. Because I had that pulmonary embolism awhile back, I am on blood thinners which didn't really help with the bruising. As you can see, it's very pretty. I am getting good at using my left hand, but hoping to regain use of that arm fairly soon!

2 days after it happened... it's even more bruised now if you can believe it!

Ok, enough show and tell for now, on to the recipe.

This recipe can easily be doubled or tripled to feed more people. Also, you can change up the toppings however you like - fresh fruit, whipped cream, crushed up candy bar, etc.

(Makes 6 Mini Cheesecakes)
Ingredients

For Crust:
1/3 cup GF Graham Cracker Crumbs (or any cookie crumbs)
1 Tbsp Sugar
1 Tbsp Melted Margarine

For Cheesecake:
1 8oz Package of Cream Cheese, softened
1/4 cup Sugar
1 1/2 tsp Lemon Juice
1/4 tsp Vanilla Extract
1 Egg

For Blueberry Sauce:
about 1 cup Blueberries
3-4 Tbsp Sugar
Just enough water to almost cover blueberries in a saucepan
1 tsp Lemon Juice (optional)

Directions

Crust:
Crush graham crackers in a ziplock bag and mix with margarine and sugar. (you could also use other types of gf cookies)
Grease 6 muffin tin holes and press mixture into the bottom.
Bake at 325 for 5 minutes. Let cool.

Cake:
Beat together cream cheese, sugar, lemon juice, and vanilla until smooth. (Use a hand mixer or stand mixer).
Mix in egg until just combined.
Pour batter into prepare crusts and bake at 325 for 25-35 minutes (until centre feels somewhat firm)
Let cool completely before removing from pan.
Chill cheesecakes in fridge until ready to serve.

For Blueberry Sauce:
Combine all ingredients in a small sauce pan and bring to a boil, stirring occasionally.
Let simmer 5-10 minutes, until it just barely starts to thicken.
It will thicken more as it cools.
Spoon over cheesecakes when serving.

graham cracker crust
mixing the batter
pour batter on top of prepared crusts
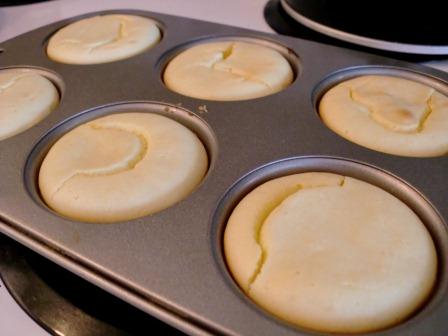
after baking
once cool, chill in the fridge
serve with blueberry sauce or topping of choice

Wednesday, 4 July 2012

Blueberry Muffins


Gluten Free Blueberry Muffins
I'm back! Well I didn't really go anywhere, but I haven't posted a recipe in almost a month... not sure how that happened. Must be the combination of the beautiful weather distractions, working on our new house, and actually working lately. Since my hubby is a teacher and I'm an EA, the end of the school year means we have more time to work on the yard and house... and hopefully time keep up on the blogging:)

We are loving our little house. It feels so good to be able to work on improving something that's our own. So far, we've removed the gravel, reseeded the left side, moved the garden, pushed back the fence, levelled the ground and added some extra nutrient rich soil. We still need to move the composter and plant the grass.
Before
Before

After

Yesterday was our 2 year anniversary. We celebrated by making BBQ steak and artichokes with homemade blueberry Italian sodas and blueberry mini cheesecakes. Delicious! I love blueberry season. I will be posting the cheesecake recipe another day, but today I want to focus on a recipe for blueberry muffins.

But first a little look at our anniversary dinner:)
mmm... smashed potatoes, steak and artichokes
Blueberry Italian Sodas
Mini Blueberry Cheesecakes
Ok so now that you're drooling, I'll get on to the feature recipe: Blueberry Muffins

(makes 14-16 muffins)
Ingredients

2 cups GF Flour (Use All-Purpose Flour Blend)
1/4 tsp Salt
1 Tbsp Baking Powder
3/4 cup Sugar (or less if desired)
1/3 cup Margarine
3 Eggs
2/3 cup Milk
1 - 1 1/2 cups Blueberries (fresh or frozen)
2 tsp Orange Zest (or lemon zest)
1 tsp Vanilla

Directions

Combine Dry ingredients in a large bowl.
In a smaller bowl, combine wet ingredients (not blueberries)
Pour wet ingredients into dry and mix until just combined.
Fold in blueberries.
Pour batter into prepared muffin tins.
Bake at 375 for 20-25 mins.
Cool on rack.
Once cool these muffins should be frozen to retain texture. I use a ziplock freezer bag.

before baking
after baking
Cool on a rack

Once completely cool, freeze

Tuesday, 12 June 2012

King Arthur Flour GF Yellow Cake Mix Review

KAF gluten free yellow cake mix
 We just finished moving in to our new house! As a house warming gift, my husband got me something I've been wanting for years... a Kitchen Aid mixer!! I got to test it out with a new mix that King Arthur Flour sent me to review: Gluten Free Yellow Cake mix. It worked like a dream... and the final product tasted like a dream.

My new Kitchen Aid in the background

I served it to my family (including gluten eaters) for a mother's day/father's day get together. Everyone loved it (the six of us almost finished the whole thing). As you can see, I made the cake version, but you can also make cupcakes from the mix. I have found that GF cake tends to be more finicky than cupcakes, but this cake was really easy to make and didn't fall at all.  I topped it with whipped cream and berries and it not only tasted, but looked amazing!

mmm... berries and whipped cream
 I've reviewed some King Arthur Flour GF mixes previously (view here), and have been very impressed with their products. This mix did not disappoint! I just wish these mixes were sold in Canada. Of course you can get them online ($6.95), but the shipping cost kind of blows my budget.

Just out of the oven
Additional ingredients were 1/2 cup butter (I used margarine with great results), 2 Tbsp vegetable oil, 4 eggs, and 2/3 cup milk. That seems like a lot of eggs, but I know they help to hold gluten free baking together, so I'm not surprised. The texture was moist and spongy. The taste was sweet with the flavour of vanilla. Just what I'm looking for in a good yellow cake.

Rating:
Cost       3 stars
Taste      4.5 stars
Texture  4.5 stars

Overall Rating: 4 stars


Thanks King Arthur Flour for providing me with these mixes. All opinions are my own.

Friday, 25 May 2012

Cranberry Apple Coffee Cake

Gluten Free Cranberry Apple Coffee Cake

It is so satisfying to make a successful gluten free cake. Anyone who's experimented with GF baking knows that. I can't even count how many times I've optimistically slid a seemingly perfect GF cake into the oven, only to pull out a rubbery, half burnt/half raw cake with a 6 inch crater in the centre 45 minutes later. How Annoying! Nowadays, there's all kinds of GF cake mixes on the market, and if you're willing to pay $6 for a mix, you can probably expect decent results (although I haven't tried most of those mixes, I'm assuming they don't suck... otherwise they wouldn't sell, right?). For those of you who'd rather not buy the processed, and rather expensive, mixes, try this recipe. Yes, it's coffee cake... but it's cake and it's gluten free, so no complaining!


This version is actually pretty healthy with apples and cranberry sauce. I sometimes even eat it for breakfast (my husband is horrified... cake for breakfast!). You could easily add extra sugar, chocolate chips, cocoa powder, or icing to make it more of a traditional cake. Or instead of apples and cranberry sauce, add your favourite fruit (blueberries, raspberries, pear slices, etc). Feel free to try another one of my versions: Ginger Peach Coffee Cake.

Make sure to bake this cake until the centre feels firm. The edges will be dark, but not burnt. Otherwise your cake will have a rubbery 6 inch crater in the middle...

(makes 9x9 baking dish)
Ingredients

1 1/3 cup Light Flour Blend (see flour blends)
3/4 cup Sugar (or less if you prefer)
2 Tbsp Baking Powder
1/4 tsp Salt
1/4 cup Oil
2 Eggs
1/2 cup Milk
1 tsp Vanilla (optional)
3/4 tsp Cinnamon
2  Peeled and Sliced Apples (med sized)
1/2 cup Cranberry Sauce (I make homemade sauce when cranberries are cheap and freeze it... it's really easy)
2 Tbsp Brown Sugar
1/2 tsp Cinnamon

Directions

Stir together all dry ingredients.
Beat eggs with milk and add, along with the rest of the wet ingredients, to the dry ingredients.
Pour into greased 9x9 baking dish.
Press slices of apples into batter (about 1/2 inch apart).
Spread cranberry sauce over the top (Doesn't need to cover the entire cake. It will sink in somewhat)
Sprinkle brown sugar and cinnamon on top.
Bake at 350 F for 45-50 mins (until very brown but not burning). The centre should be firm to the touch.
Let cool and cut into 9 square pieces.
Press apple slices into batter


Spread cranberry sauce over the top (you don't need quite this much... I just used all of my leftovers)


Bake at 350 for 45-50 minutes
Serve with coffee for breakfast, dessert, or an afternoon snack!


Saturday, 19 May 2012

Enjoy Life Chewy Bars Review


I recieved some of Enjoy Life's newly designed Chewy Bars to review. Since I started working again last week, and the school is a nut free zone, I was excited to have some nut and gluten free snacks to bring in my lunches. I had a chance to try all 4 of their flavours, Cocoa Loco, Caramel Apple, Sunbutter Crunch and Very Berry. They made great, filling snacks and were only 110 calories each (excluding the sunbutter variety which was 120 calories). At $4.29 for a box of 5 bars, they are not cheap, but compared to other allergy friendly granola bars, they were reasonable.

Enjoy Life Chewy Bars: Caramel Apple and Very Berry

Enjoy Life Chewy Bars: Sunbutter Crunch and Cocoa Loco

Cocoa Loco


This was definitely my favorite flavour! They tasted like brownies, but still had 2 grams of fibre, 2 grams of protein, 3.5 grams of fat and only 110 calories. Also, 1 bar contains 10% of required daily iron. I would buy this variety again for a snack or even dessert.

Health       4 stars
Cost          3 stars
Taste         4.5 stars
Texture     4 stars

Overall Rating:  3.9 stars
 
 
Caramel Apple
 
The Caramel Apple Flavour was probably my second favorite. I liked the flavour of the bar and the fact that there were small chunks of dried apple in it. One thing I didn't enjoy is the small hard pieces in each of the last 3 flavours. I'm not sure what they are, but I found it to be hard on my teeth.
The caramel apple bar has 3 grams of fat, 2 of fibre and 1 gram of protein.
 
Health       4 stars
Cost           3 stars
Taste         4 stars
Texture     2 stars

Overall Rating: 3.25 stars
  
 
Sunbutter Crunch
 
This flavour was also enjoyable, but had the same issue with texture. I liked that it had a peanut buttery taste, but was made with sunflower seeds instead (making it safe for those with nut allergies). The sunbutter gave it a slightly higher fat and calorie content (4 grams fat and 120 calories), but I don't mind a little extra healthy fat. Each bar also contained 2 grams of fibre and 2 of protein.
 
Health      4 stars
Cost         3 stars
Taste        4 stars
Texture    2 stars

Overall Rating: 3.25 stars
 
 
Very Berry
 
This flavour was my least favorite, simply because of the taste. I didn't enjoy the berry flavour, even though I like berries (and the flavour was natural). It reminded me of a nutrigrain bar which, although I haven't had one in many years (ahem, gluten), I remember disliking as a child. I also didn't enjoy the texture with the small, hard pieces mixed in. Each bar contained 2.5 grams of fat, 2 grams of fibre and 1 gram of protein.
 
Health      4 stars
Cost         3 stars
Taste        1 stars
Texture    2 stars

Overall Rating:  2.5 stars
 
 
Thanks Enjoy Life Foods for providing these free samples for me to review. All opinions are my own
 

Wednesday, 2 May 2012

Granola Cookies

Gluten Free Granola Cookies

I found this recipe on pinterest the other day and just had to try it. I love that there is no sugar or sugar substitute, but it's still sweet from the mashed bananas. I made a few minor changes, but the idea is the same. This blogger called them breakfast cookies, but I decided to call them granola cookies because they are very similar to granola bars, only in cookie form. They do make a great (and healthy) breakfast on the go, and I'm sure kids would be ecstatic to have cookies for breakfast! With all the protein and fibre, they are a satisfying breakfast or snack for anyone.

(makes about 2 dozen small cookies)
Ingredients

3 Medium Mashed Bananas
1/4 cup Canola Oil
1 Egg (may be omitted)
1 tsp Vanilla

1 1/2 cups GF Oats (I used quick oats but rolled would work too)
1/2 cup Dried Coconut (sweetened or unsweetened)
1/2 - 3/4 cup Dried Fruit (raisins, craisins, apricots, etc)
1/2 cup Chopped Nuts
1/4 tsp Salt
11/2 tsp Cinnamon
1/4 tsp Nutmeg


Directions

Combine wet ingredients in a large bowl.
Add dry ingredients to bowl and mix thoroughly
Drop spoonfuls of mixture on parchment lined baking sheet and form into desired shape.
Bake at 350 for 15-20 mins until they just begin to brown.
Store any left over cookies in freezer.

Before Baking (line with parchment - unlike me)
After Baking